Login
Login
Winner's Excogitations
A chronicle of the thoughts, learning experiences, ideas and actions of a tech junkie, .NET, JS and Mobile dev, aspiring entrepreneur, devout Christian and travel enthusiast.
GIT - For The Absolute Beginner (Part 2)
GIT - For The Absolute Beginner (Part 2)

As a sequel to this post on the common git commands that you would find helpful in your workflow, this post aims to be a glossary of technical terms used when working with git in particular but could also apply to other version control systems. In this tutorial, I would be taking you through a simple git setup from beginning to end. We would initialize the git repository, add files to it, add remotes, and push code to origin. Future articles would deal with adding a gitignore file, removing files from tracking, branching, setting an upstream and pulling from origin.
Requirements
To follow this tutorial, two pieces of software are necessary and one is optional but recommended.
- You will need an account with an online version control system provider such as github.com, bitbucket.org or gitlab.com. I recommend going with github.com as it is the most widely used online VCS provider. The registration process is simple and intuitive.
- You will need the git command line tools installed on your computer.
- For macOS users, it can be gotten here
- For Windows users, it can be downloaded here
- For Linux users, it can be gotten via the package manager with
sudo apt-get install gitfor Debian based distributions andsudo yum install gitfor Fedora-based distributions.
- The optional thing is a text editor. There are a few popular ones out and about in the wild but I’ll recommend
Visual Studio Codebased on personal experience. It can be gotten here (for Windows, MacOS and Linux). The text editor would be used for working on the files we’ll add to tracking.
Procedure
- Since you just installed git, you would need to configure git. For that we would need to run two commands:
git config --global user.name "John Doe"
This command is for you to set your name as you want it to reflect on the remote sites you would be pushing your code to. The John Doe is an example and/or placeholder and should be replaced with your name.
git config --global user.email "john@doe.org"
As was stated for the previous command, the john@doe.org is also a placeholder and you should be replaced with the email address that you used for the online version control system registration.
With that out of the way, we go ahead and create a folder that would contain our code. Create a folder named
git-workflowNB: creating folders on each OS platform is different, so I would leave it to you to do.Next open that folder in the terminal (for macOS and Linux users) or the command prompt (for the Windows users). I created my folder in the Documents directory on my Mac, so to get into that folder, I would run the command:
cd /Users/winner-timothybolorunduro/Documents/git-workflow
- The next command we are to run would initialize the folder as a git repository. Initializing adds a hidden folder and a bunch of files that git uses to track changes to the files you add to tracking. The command is:
git init
this gives an output in the terminal similar to this:
Initialized empty Git repository in /Users/winner-timothybolorunduro/Documents/git-workflow/.git/
- Now that we have configured our folder as a git repository, let us add the files we want in our repository. Here the recommended text editor Visual Studio code comes in handy. If you installed it, you can open the folder in Visual Studio Code from the terminal (on macOS and Linux) by running the command:
code .
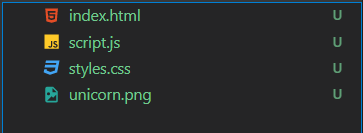
this starts the visual studio code and opens the folder in the app. Create three files, index.html, styles.css and script.js. These files would be what we add to tracking.
- Next we add the files to tracking by using the git command line. We use the
addcommand and pass the files to be tracked as arguments. In this instance, we would run:
git add index.html
git add styles.css
git add script.js
- Next we commit the files added. A commit is just a point of record for all that has been done up until that point. We commit using the git command-line tool and we also need to give a commit message which is basically a description of what we have done till that point. In our case we’d run:
git commit -m "added code files"
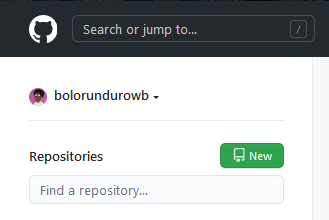
- Now that we have set up our local repository, let's create a remote one so we can have our code at a remote location too. So we go to GitHub and create a new repository. look for the new repository button as shown below and click it
When clicked, an interface such as the one below is displayed.
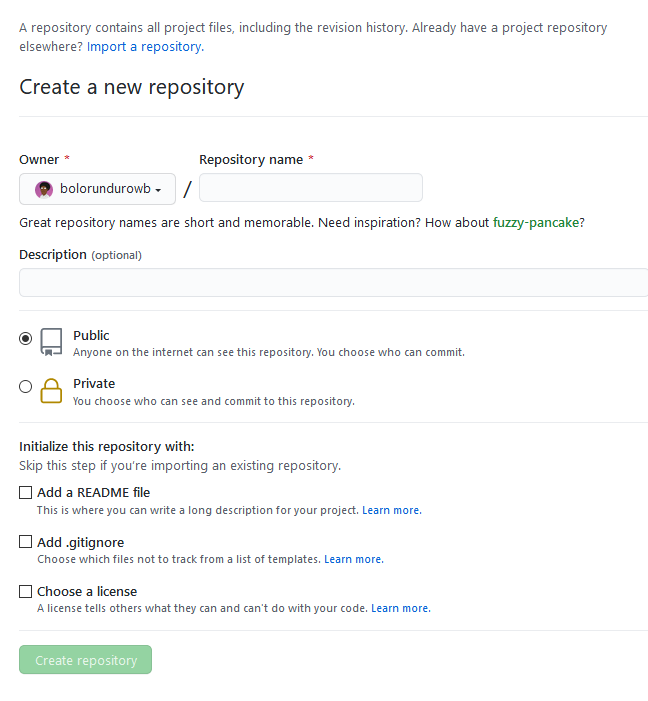
Fill in git-workflow for the repository name and click the "create repository" button.
Copy the link shown in the text box and proceed to the next step.
- Now we add the remote repository that our local repository would track. This means we can send code from our local working folder to the GitHub repository and pull any code there to our local machine. To add a new remote, we run the command:
git remote add origin https://github.com/bolorundurowb/git-workflow.git
- With that done we can push the code files from our local machine to GitHub. Simply run the following git command:
git push origin master
The push command is used to send commits from the local machine to a remote branch. Once this is done, we refresh our repository’s GitHub page and we’ll see our code files there.

And this is what my terminal looked like after running the commands:

With that we come to the end of an initial dip into git and version control in general. My next article would get us into things like branching. I’d love to hear your feedback and suggestions in the comment section. Have a great time learning.
Share on:
Getting Started With ASP.NET Core (Part 1)
A simple tutorial to introduce a beginner to ASP.NET Core.
Becoming World Class - The Journey So Far
A synopsis of what has dawned on me in my quest to being world class


Comments