Login
Login
Winner's Excogitations
A chronicle of the thoughts, learning experiences, ideas and actions of a tech junkie, .NET, JS and Mobile dev, aspiring entrepreneur, devout Christian and travel enthusiast.
Xamarin Forms: How To Use Custom Fonts
Xamarin Forms: How To Use Custom Fonts

Introduction
There are a number of reasons why you would want to use a font other than the default one provided by the OS when developing mobile applications with Xamarin Forms. Whether it is for branding purposes or to simply add some pizzazz to the UI of the app, up until the release of Xamarin Forms 4.6, the process was tedious and contrived to say the least. With the release of version 4.6, the process has been simplified a lot.
For this walkthrough, I would be demonstrating how to use the simplified font embedding process using a common enough scenario. Adding in font icons from the popular Font Awesome pack. They provide quite the number of icons and they claim to be the "web's most popular icon set" and rightfully so if may add.
Downloading the font files
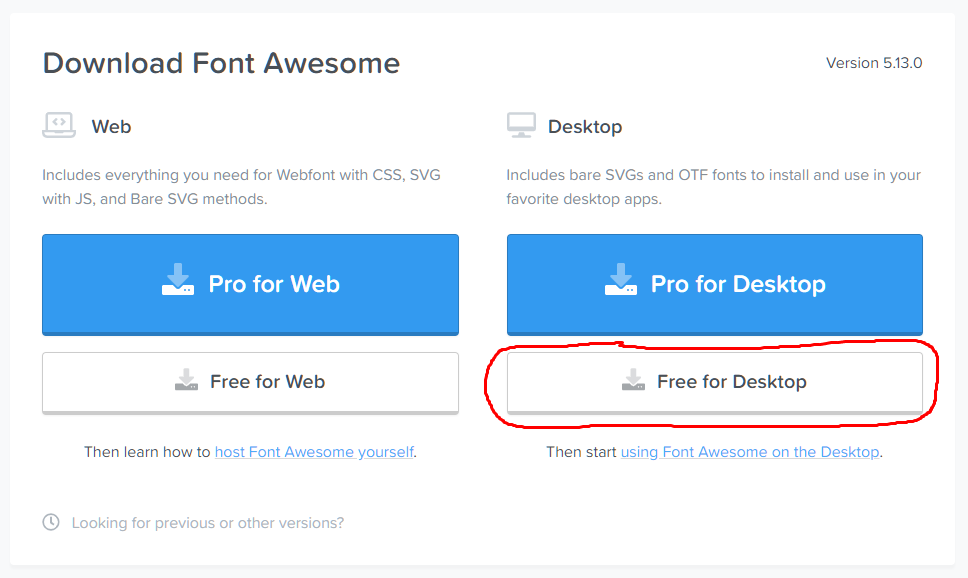
Font files come in a number of formats but as at the time of writing, I have been able to verify support for ttf (TrueType font) and otf (OpenType font) files. For our particular scenario, to get the font files, we head over to https://fontawesome.com/download and click on the "Free for Desktop" button. That downloads a .zip file to your computer.
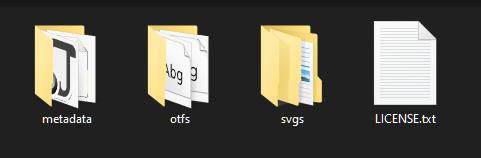
Next, to access the font files, we need to extract the contents of the downloaded zip file. Locate the downloaded file and extract the contents using the tool of your choice. The extracted contents should look something like this:
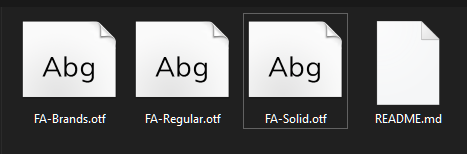
If we drill deeper into the otfs folder, we should see content like this:

To add simplicity for later work, I renamed the files to make them easier to remember and work with. Font Awesome 5 Brands-Regular-400.otf became FA-Brands.otf. Font Awesome 5 Free-Regular-400.otf became FA-Regular.otf. Font Awesome 5 Free-Solid-900.otf became FA-Solid.otf. After all the renamings, my otfs folder now looks like this:
Importing the font files
Before importing the font files into our projects, we need to create the necessary folder structure. In your shared PCL or NET Standard project, add a Resources folder and inside that, add a Fonts folder. After that, your folder structure should have something like this:
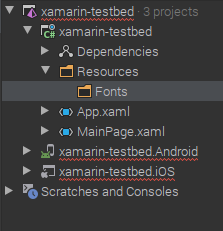
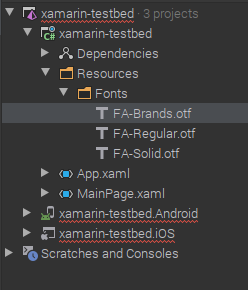
Import the newly downloaded and renamed .otf font files into the Fonts folder. NOTE: For each of the imported font files, ensure the Build Action is set as Embedded Resource. Your project should now look like this:
Consuming our new fonts
Next, we export our fonts. To do that, open your App.xaml.cs or your AssemblyInfo.cs file and above the namespace declaration, add the following:
[assembly: ExportFont("FA-Brands.otf", Alias = "FAB")]
[assembly: ExportFont("FA-Regular.otf", Alias = "FAR")]
[assembly: ExportFont("FA-Solid.otf", Alias = "FAS")]
I added aliases for all my exported fonts. This would make it easier to reference them in my XAML files. To display the artstattion font in my app, I grab the hex code from the font-awesome page

And then set up a Label to display the glyph as shown. NOTE: the glyph hex code has to be prefixed with a &#x and postfixed with a ; for it to be considered valid by Xamarin Forms.
<Label
Text=""
FontFamily="FAB"
HorizontalOptions="Center"
FontSize="50"
VerticalOptions="CenterAndExpand" />
Here is my final result.

I hope this was informative. Till the next one.
Cheers
Share on:
Xamarin Forms: Handling User Preferences
A short guide to handling user preferences in Xamarin Forms
[HOW TO] Run A Geospatial Search With EF Core and Npgsql
A simple how-to around finding entities with points that fall within a set of coordinates.


Comments