Login
Login
Winner's Excogitations
A chronicle of the thoughts, learning experiences, ideas and actions of a tech junkie, .NET, JS and Mobile dev, aspiring entrepreneur, devout Christian and travel enthusiast.
Xamarin Forms: Handling User Preferences
6 years ago · 3 minutes read

Introduction
As you build a mobile app, you may want to save small bits of user data and/or preferences usually as a key-value pair. For a while, there was no Xamarin cross-platform way of getting that done, so platform-specific code had to be written. With the introduction of Xamarin Essentials, a number of commonly accessed functionality has been made cross-platform. In this guide, we'll walk through persisting some user data in a Xamarin Forms application. NOTE: If you want to save sensitive data, use Secure Storage instead.
Setup
Using your favourite editor, create a Xamarin Forms project. I am using JetBrains Rider as my IDE and naming my project xamarin-forms.
Installing the library
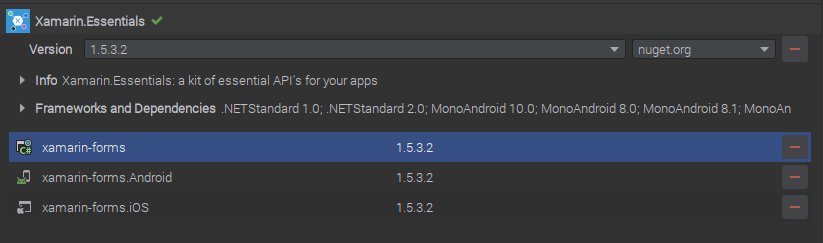
To make use of the Xamarin Essentials library, it has to be installed in the PCL/NET Standard project as well as any platform-specific projects. For my own IDE, this is the view:
After the installation is complete, if there is an Android target project then we need to update the MainActivity.cs file (or any other Activity file that is the launch target) with the following:
...
base.OnCreate(savedInstanceState);
// add the line below to your file
Xamarin.Essentials.Platform.Init(this, savedInstanceState);
...
Persisting data
For this example, I want to save the current Date and Time in the user's preferences when I call a method. The logic for my method is shown below:
using Xamarin.Essentials;
...
public void SaveToPreferences()
{
    Preferences.Set("app_CurrentDate", DateTime.UtcNow);
}
In this case, we saved a DateTime type to the preferences but the library has overloads to support a number of primitives including bool, double, int, float, long and string.
Retrieving saved data
To retrieve the data I persisted, I would add in a method to get the date I saved. The method is shown below:
protected DateTime ReadSavedPreference()
{
    var date = Preferences.Get("app_CurrentDate", DateTime.MinValue);
    return date;
}
The more astute of you would have noticed the DateTime.MinValue values provided to the Get method. That is the default that the method returns if the provided key does not exist. For our example, if we have not saved a value to the app_CurrentDate key, then the default .NET minimum DateTime value (1/01/0001 0:00:00 AM) would be returned.
Cleaning up
If at any point we no longer need the data tied to a certain key, we can remove the data. In the context of the data, we have saved in the previous examples. if we were to create a method to remove the date we saved, the method implementation should look like :
public void RemoveSavedDate()
{
    Preferences.Remove("app_CurrentDate");
}
If we want to remove all saved app preferences, the Xamarin Essentials library provides us with a handy method to accomplish that as well.
Preferences.Clear();
Till the next one,
Cheers
Xamarin Forms: How To Use Custom Fonts
6 years ago · 4 minutes read
Introduction
There are a number of reasons why you would want to use a font other than the default one provided by the OS when developing mobile applications with Xamarin Forms. Whether it is for branding purposes or to simply add some pizzazz to the UI of the app, up until the release of Xamarin Forms 4.6, the process was tedious and contrived to say the least. With the release of version 4.6, the process has been simplified a lot.
For this walkthrough, I would be demonstrating how to use the simplified font embedding process using a common enough scenario. Adding in font icons from the popular Font Awesome pack. They provide quite the number of icons and they claim to be the "web's most popular icon set" and rightfully so if may add.
Downloading the font files
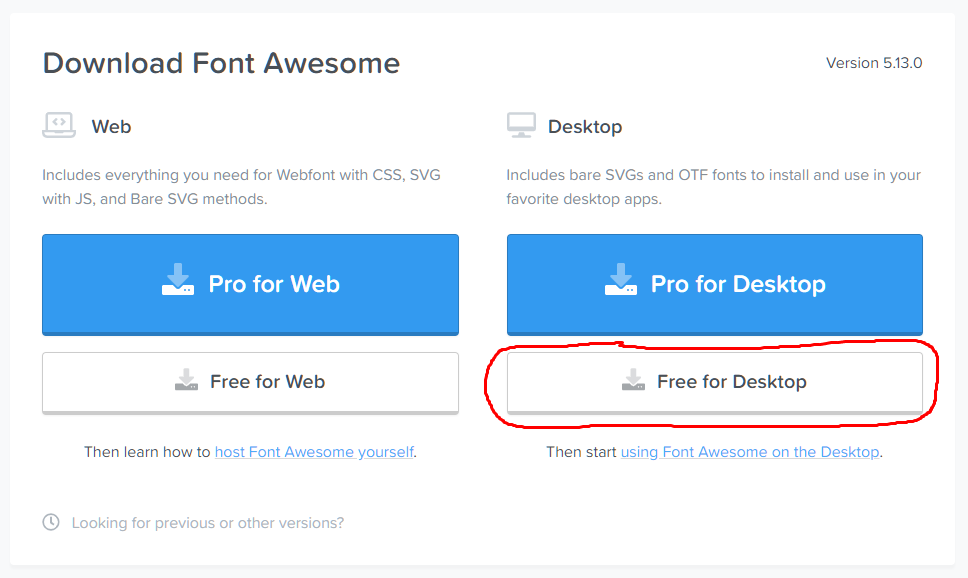
Font files come in a number of formats but as at the time of writing, I have been able to verify support for ttf (TrueType font) and otf (OpenType font) files. For our particular scenario, to get the font files, we head over to https://fontawesome.com/download and click on the "Free for Desktop" button. That downloads a .zip file to your computer.
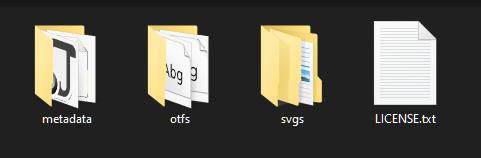
Next, to access the font files, we need to extract the contents of the downloaded zip file. Locate the downloaded file and extract the contents using the tool of your choice. The extracted contents should look something like this:
If we drill deeper into the otfs folder, we should see content like this:

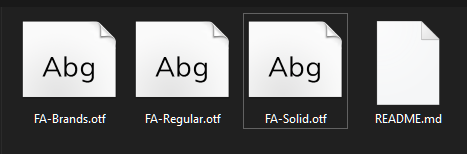
To add simplicity for later work, I renamed the files to make them easier to remember and work with. Font Awesome 5 Brands-Regular-400.otf became FA-Brands.otf. Font Awesome 5 Free-Regular-400.otf became FA-Regular.otf. Font Awesome 5 Free-Solid-900.otf became FA-Solid.otf. After all the renamings, my otfs folder now looks like this:
Importing the font files
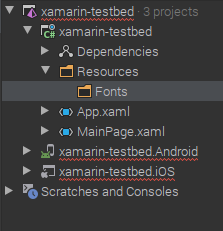
Before importing the font files into our projects, we need to create the necessary folder structure. In your shared PCL or NET Standard project, add a Resources folder and inside that, add a Fonts folder. After that, your folder structure should have something like this:
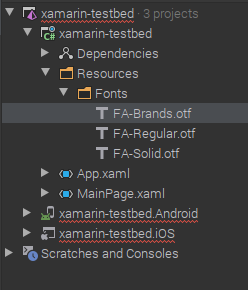
Import the newly downloaded and renamed .otf font files into the Fonts folder. NOTE: For each of the imported font files, ensure the Build Action is set as Embedded Resource. Your project should now look like this:
Consuming our new fonts
Next, we export our fonts. To do that, open your App.xaml.cs or your AssemblyInfo.cs file and above the namespace declaration, add the following:
[assembly: ExportFont("FA-Brands.otf", Alias = "FAB")]
[assembly: ExportFont("FA-Regular.otf", Alias = "FAR")]
[assembly: ExportFont("FA-Solid.otf", Alias = "FAS")]
I added aliases for all my exported fonts. This would make it easier to reference them in my XAML files. To display the artstattion font in my app, I grab the hex code from the font-awesome page

And then set up a Label to display the glyph as shown. NOTE: the glyph hex code has to be prefixed with a &#x and postfixed with a ; for it to be considered valid by Xamarin Forms.
<Label
Text=""
FontFamily="FAB"
HorizontalOptions="Center"
FontSize="50"
VerticalOptions="CenterAndExpand" />
Here is my final result.

I hope this was informative. Till the next one.
Cheers
Using the Firebase realtime database with .NET
6 years ago · 4 minutes read

A Brief Aside
Over my over 6 years in the software development space and specifically in the .NET ecosystem, I have noticed a kind of animosity towards Microsoft and the .NET platform. Companies create services and develop libraries for just about every other platform but .NET. The excuse cannot be lack of demand as C# is the 7th most used language and ASP.NET the 4th most used web framework by the Stack Overflow developer survey. Despite my ire with the current situation, I do not think it is wholly undeserved as Microsoft has acted in a similar manner over the years, though the organization under Satya Nadella has changed its approach to collaboration. Hopefully, things improve.
Introduction
Firebase is a Backend-as-a-Service (BaaS) that started as a YC11 startup and grew up into a next-generation app-development platform on Google Cloud Platform. Arguably, the mostly widely used product in the Firebase suite is their real-time database. The Firebase Realtime Database is a cloud-hosted NoSQL database that lets you store and sync between your users in realtime. The Realtime Database is really just one big JSON object that the developers can manage in realtime.
Why Firebase?
For a mobile developer with little backend development skill or for a developer who is time-constrained in delivering a mobile product, Firebase takes away the need for building out a dedicated backend to power your mobile service. It handles authentication if you so desire and data persistence and for officially supported platforms, it even offers fail-safes for data if there is a network connectivity interruption. Sadly, .NET is not currently an officially supported platform. I remember seeing a petition or thread of some sort requesting official support from Google but can't seem to find it. Fortunately, we have a workaround. the fine folks over at step up labs wrote a wrapper around the Firebase REST API which gives us access to our data.
Installation
Now to the juicy bits, we need to install the libraries we need. To the shared .NET standard Xamarin project, run one of the following commands, depending on your preference:
Install-Package FirebaseDatabase.net
or
dotnet add package FirebaseDatabase.net
Handling Data
We need to create a model for the data we need to persist and modify. For that, we create a directory called Models. Next, we create a file Student.cs to hold our Student model as defined below:
public class Student
{
  public string FullName {get; set;}
  public string Age {get; set;}
}
The next step is CRUD (Create, Read, Update and Delete) for our data. In order to keep everything all tidy and such, we create a directory Services and a file StudentService.cs to hold our service logic. Remember, data in Firebase has to be stored as key-value pairs. To add support for persisting data to our service, we do the following:
using System;
using Firebase.Database;
using Firebase.Database.Query;

public class StudentService
{
  private const string FirebaseDatabaseUrl = "https://XXXXXX.firebaseio.com/"; // XXXXXX should be replaced with your instance name
  private readonly FirebaseClient firebaseClient;

  public StudentService()
  {
    firebaseClient = new FirebaseClient(FirebaseDatabaseUrl);
  }

  public async Task AddStudent(Student student)
  {
    await firebaseClient
      .Child("students")
      .PostAsync(student);
  }
}
To make use of our service, we add the following, it can be added to the code-behind files of views or in other services:
...
public StudentService service = new StudentService();
...
var student = new Student
{
  FullName = "John Doe",
  Age = "21 Years"
}
await service.AddStudent(student);
To retrieve the students we have saved to the database, we can add a new method to our StudentService class:
using System.Collections.Generic;
...
public class StudentService
{
  ...

  public async Task<List<KeyValuePair<string, Student>>> GetStudents()
  {
     var students = await DatabaseClient
       .Child("students")
       .OnceAsync<Student>();

      return students?
        .Select(x => new KeyValuePair<string, Student>(x.Key, x.Object))
        .ToList();
  }
}
As you can observe with the data retrieval above, when we push new data to Firebase, a new Id is generated for the record and we can get that Id when we retrieve our data. The Id comes in useful when we need to update data we have on Firebase as shown below:
public class StudentService
{
  ...
  public async Task UpdateStudent(string id, Student student)
  {
     var students = await DatabaseClient
       .Child("students")
       .Child(id)
       .PutAsync(student);
  }
}
Removing an entry is just as easy, we just need the id generated for the entry we need to remove. Update your StudentService class with a method to aid removal as shown below:
public class StudentService
{
  ...
  public async Task RemoveStudent(string id)
  {
     var students = await DatabaseClient
       .Child("students")
       .Child(id)
       .DeleteAsync();
  }
}
Further Reading
The complete source for the samples shown can be found on GitHub. While I touched on the basics of accessing data from firebase, the FirebaseDatabase.net library offers support for more advanced data query options such as LimitToFirst and OrderByKey amongst others. It also offers data streaming similar to that of the official libraries with the System.Reactive.Linq namespace. You can find more in-depth documentation at the project GitHub page.
That's it for now,
Cheers.
My Journey into the belly of the beast. (A tale of learning Xamarin Forms)
7 years ago · 2 minutes read

So I recently decided to learn developing mobile apps using Xamarin Forms. My decision to learn Xamarin Forms went against my very strong and vocal opposition to cross-platform, “write once, run anywhere” mobile applications of any sort as I felt that cross-platform apps would have to make comprises on the user interface and user experience on one or more of the platforms they target. I also felt that no matter how optimised or “Native” the designer of the hybrid And it seems the research confirms my hunch.
I come from a strong C# background and subconsciously harboured the natural resentment that .NET developers have for Java and those who fraternize with it, BUT I swallowed my pride and learnt how to develop native Android apps with Java and the Android SDK and in the process came to understand that a great developer leaves the religiousity and flame-war-ishness to lesser mortals and always select the best tool for the job.

That said, I wanted to pick up iOS development and I needed to make a decision as to whether or not I would learn Swift and the Cocoa Touch framework. Because I used Linux for a while, I had learnt about the Mono project and used Mono runtime for my C# development (still do). In the process, I found out about Xamarin and their product line. That was when I ran the pros and cons of learning Swift and the Cocoa Touch framework or using Xamarin Forms.
This is quite the anticlimactic end as instead of agonising over the decision as you would expect, it was quite easy for me. For starts, Xamarin Forms made use of C# for application log, a language which I love and am very versed in, and XAML for user interface design which I was familiar with from my Windows 8 (MetroUI) app development days, and to put the cherry over this already tasty cake, Xamarin Forms compiles natively on each platform.
As I progress on this journey of learning, I would be creating posts about my learning experiences, not just technical but all-around learning.