Login
Login
Winner's Excogitations
A chronicle of the thoughts, learning experiences, ideas and actions of a tech junkie, .NET, JS and Mobile dev, aspiring entrepreneur, devout Christian and travel enthusiast.
Becoming World Class - The Journey So Far
7 years ago · 3 minutes read
“Maybe the journey isn’t so much about becoming anything. May it’s about un-becoming everything that isn’t really you. So you can be who you are meant to be in the first place.” - Unknown
Recently, I was thinking about starting a new Open Source project on GitHub and was making a mental run down of the languages and/or frameworks I’d make use of and I gave a start as I came to a realisation. As recently as April 30th of last year (2016) the language issue would have been set by default (and permanently if I may add) to C# and the framework would have been one of Windows Forms, WPF or ASP.NET (If I was feeling especially adventurous) and I wouldn’t have entertained the thought of using anything else as I had learnt C# and had become very familiar with it.
The realisation that I had become willing to make use of relatively new languages (to me) and frameworks I wasn’t quite comfortable with made me realise how much I’d “grown” in the latter half of the year. On the surface, it might not look like much but if you have interacted with me you’d understand how much had to have gone on underneath for me to get that point. Let me explain;
I am a die-hard C# fan, I taught myself C# from Console applications to Web applications and in all my years of using it, neither it nor the .NET framework have disappointed me. And from 2012 to 2016 anything I needed to get done software development wise, I did it in C#. Even when people came to me for advice on technologies and tools to use, I invariably gave them a C#/.NET related solution. Because of my investment in the language and underlying framework, I had boxed myself into a corner where I didn’t do anything but C# and learning other languages seemed to be a distraction from making further advances in my mastery of C# and the supporting frameworks. What I failed to realise was that while C# was a great language and .NET an excellent framework, there were some things they were either poorly optimised for or just couldn’t do.
Looking back at the Winner of April whose mantra was “C# and .NET or I can’t be bothered”, I can see just how far I have come. I now understand that progress at times isn’t gaining something new, but losing something old. Now, the mantra is “the best language, framework and tool for the task at hand (except it is PHP I’m kidding, I’m totally serious 😉 )”. Over the past nine months I have done more than just learn new languages, I have tried my hands at new software development paradigms, I have learnt to stand in a person's shoes to understand (yes, pun intended) why they hold the opinions they do, I have dipped my toes into a thousand and one things and I have come to this conclusion;
“Being able to reason without constraints is the greatest gift you can give yourself for then the whole world is open to you”.
All in all, I am grateful for who I am now and who I am becoming every day as I learn and interact with people and tools more. At this point, I feel like John Wick who can do as much damage with a pencil as with a cruise missile. The journey to being world class still continues.
GIT - For The Absolute Beginner (Part 3 aka the Finale)
7 years ago · 4 minutes read

This is the third part of a series that aims to take the reader from zero to hero when it comes to using the Git version control system. Part 1 covered the various git commands and their usages. Part 2 was a step by step tutorial on setting up a local git repository, adding files to tracking and pushing to GitHub. In this part, we’d deal with creating branches, merging branches, rebasing and fixing conflicts.
NOTE: This is a continuation of the work done in part 2, so if you haven’t gone through that, endeavour to do that.
Branching
What is branching in git? In its most basic form, branching is the process of creating a copy of the current state of your project so that you can make changes without affecting the original state. Let’s say, for example, you are working on a website and you are done with the design. Your supervisor comes in and asks you to change the login button to bright pink with a unicorn as the icon. You wouldn’t want to make the requested changes to the files directly as that would mean the site would be unavailable till you’re done making the changes, this is where branching comes in handy. Since a picture is worth a thousand words, here is an image showing what branching is courtesy of Atlassian.
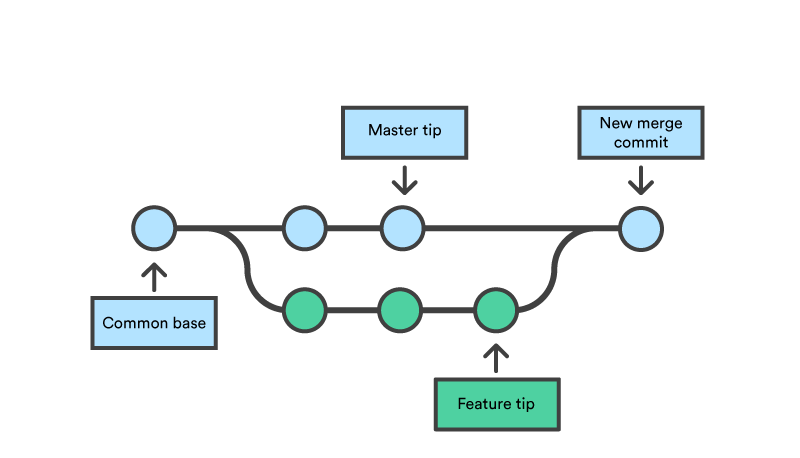
In the infographic above, the purple (little feature) and green (big feature) lines are branches of master (the blue line). Whatever changes are made in the branches do not affect the master branch. As an aside, throughout this tutorial, we would be mentioning the master branch a lot, the master branch basically is the main branch or the branch from which all other branches can trace their source.
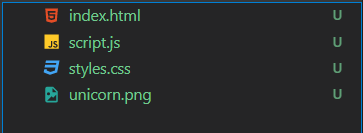
In part 2 of this tutorial series, we added three files to the master branch of our repository. The index.html, script.js and styles.css files. Going with the example we laid, let's say I am to add a pink button with the unicorn icon. I would create a feature branch using the following command
git branch new-login-button
this creates a branch named new-login-button and it would contain an exact copy of the code in the master branch. To switch to the spanking new branch we just created, we use the following command
git checkout new-login-button
we proceed to make the changes we need to the index.html and styles.css files as we see fit.
Place this in the HTML file:
<html>
  <head>
    <title>Git Workflow</title>
    <link rel="stylesheet" type="text/css" href="./styles.css" />
    <script src="./script.js"></script>
  </head>

  <body>
    <button class="btn">
      <img src="./unicorn.png">
      <br/>
      LOGIN
    </button>
  </body>
</html>
Place this in the CSS file:
.btn {
  width:170px;
  height:95px;
  color:black;
  background-color:rgb(242,84,110);
  font-size:18px;
  font-weight:bold;
  border-radius:8px;
}

img {
  height:35px;
  width:35px;
}
Next, we have to add the files to tracking by using the following command:
git add .
Next, we commit the changes using:
git commit -m "add pink button with unicorn logo"
Merging
Even as branching is creating a copy of the branch you are on so you can make changes, merging is the process of bringing the changes you have made back into the root branch. Continuing with the example we are working with, I created the button as instructed by my supervisor. This was my output:
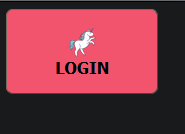
Lets say that after review, my supervisor is elated with my super awesome unicorn button and approves its depeloyment. This means my work has to get to the master branch from the new-login-button branch we created earlier. This is where merging comes into its own. We would run two commands, one to switch to the master branch, the second actually merges the changes:
git checkout master

git merge new-login-button
Other useful commands
To retrieve the latest changes on your remote repository, you run the following
git pull origin "<branch-name>"
To push your local changes to your remote repository, you can run:
git push origin <branch-name>
Summary
While this series has not been exhaustive, I trust that we have covered the often-used commands in the Git world.
Andela Bootcamp - What I learnt (Part 2)
7 years ago · 4 minutes read

As promised in my first post, this is the second and hopefully last part of the recounting of my Andela boot-camp days. To give a recap of my first post, the boot-camp lasted two weeks and covered a broad range of disciplines. In the first post, I covered Git, Programming Logic, Relationship Building, Questions, OOP (Object Oriented Programming), TDD (Test Driven Development), Writing Proficiency, Agile Programming and Feedback. This post aims to give a short synopsis on the second set of nine skills. Without further ado, let’s dive in.
Motivation and Commitment: It is common knowledge that for you to give your best to any task, you have to be first motivated and then committed to seeing it through. So we weren’t belabored with those during boot-camp. Instead what was discussed were the factors that affect our consistent motivation and commitment. As we discussed steps that could be taken to ensure we stay motivated for the entirety of any given project.
Speaking to be understood: Prior to boot-camp, I had always fancied myself as a pretty good public speaker, but some things I came across at boot-camp really challenged my concept of good public speaking. One of such concept challenges was that good public speaking is not about how well you feel you have delivered your message but how well your audience got the message you were trying to pass across. Also, converse to conventional wisdom, good public speaking is passing as much information in as few words as possible; the less you say, the more people remember.
Teams: There is a big chasm between knowing something, believing it and then acting it out. I have always that working in teams more often than not was better than working alone, but that knowledge had not translated into a belief for me as I prefer working on my own till boot-camp. In boot-camp, I was placed in a team and we were given a task involving git, and for the first time, I had to do my part and trust everyone else to do theirs. Since then, I have worked in teams and I’m still working in one and I have come to believe in and act out team dynamics.
HTTP and Web Services: This was about the most magical thing I discovered at boot-camp. Apart from the meaning of HTTP and knowledge that it was the protocol by which HTML pages are served, I have virtually no knowledge about the power of HTTP. During boot-camp, we were introduced to RESTful APIs and how they differ from SOAP. We were also taught how REST is powered by HTTP verbs (GET, POST, PUT, DELETE, and PATCH) [I might make a tutorial on this in the future, place a comment if you want one. I could do it in JavaScript or C#]. One of the given tasks was to design a simple website that consumes a web service of your choice. I chose open weather, got an API key and made what I considered then the most amazing app. The app displayed the weather data for any location entered.
Adaptability: Well, this was especially difficult for me and let me explain why. I have taught myself C# ( a statically typed language) and have made use of the language to solve nigh on every software problem I have encountered. Admittedly I used python for the home study curriculum, but at boot-camp, it was a JavaScript storm. For those who still don’t know what my beef could be, let me break it down. First, JavaScript is a dynamically typed language which means you don’t tell the interpreter what the type of data you’re is. Let me give an example; To define an integer in C#:
int num = 12;To define the same number in JavaScript:var num = 12;To define a name in C#:string name = “Julius”;To do the same in JavaScript:var name = “Julius”;. For me, JavaScripts’ lack of order was very disturbing. And you bet IntelliSense cannot work properly with a dynamic language. Also, all errors were discovered when I was running the program. Finally, the stack trace for JavaScript is just the worst. Now that I am done venting my spleen, I first learned to tolerate JavaScript, then I made my peace with it and now, I am actually not against it anymore. For a world-class developer, being able to adapt to any and every situation is crucial.Front-end: During boot camp, we were only taught front end design briefly and theoretically but I got a first-hand experience with front end design when working on my final project. I learned that trying to reinvent the wheel especially regarding CSS is a very bad and time intensive choice. My advice for anyone is this, look for a CSS framework that will meet your basic needs and tweak it to meet your other needs.
Stack Specific Proficiency: I was so glad that I finally got to understand what the MEAN I had been hearing meant. MEAN is an alphabetism of MongoDB as the database, ExpressJS for routeing, AngularJS for front-end data-binding and manipulation and finally NodeJS for the back-end. This is known in programmer-speak as a full stack because knowledge of all elements of the stack means (pun intended) that you can build a website completely. MEAN is not the only JavaScript stack. There is the PREN stack which is an alphabetism of PostgreSQL as the database, ReactJS as the front-end framework, ExpressJS for routing and NodeJS as the back-end. Other languages also have their stacks and ASP.NET with SQL server is a full stack for a C# developer.
Growth: For a world-class developer, a constant desire to grow is a basic requirement. At boot camp, we were taught about the various mindsets and how they affect our growth and achieving our potentials.
Thanks for taking the time to read through this. If you are going for the boot-camp, don’t be afraid, don’t be cocky, be proactive in every activity. Just as a side note, I got in.
Andela Bootcamp - What I learnt (Part 1)
7 years ago · 5 minutes read
I recently went through Andela boot camp cycle XVIII from the 16th of May to the 27th of May this year. I mentioned in a previous post that my experience at the boot camp was extremely informative and educative. I promised to give a synopsis of the boot camp and I aim to deliver in this post. The boot camp lasted two weeks, and we covered eighteen topics in the course of those two weeks. I will not go exhaustively into every detail of what we did, but I’ll show the broad range of disciplines we had to absorb knowledge from. All in all, I came to understand that software development was much more than writing code.
Git: During boot camp, I was first introduced to the concept of version control, the root idea which spawned version control systems like Git, SVN, and TFS. I’ll do a tutorial on command line git itself in the near future.
Programming Logic: We first discussed the various programming paradigms that exist and how they differ. Next, we how and why code is sub divided and grouped. We also learned the principles that help software developers decide when to group code.
Relationship Building: this dealt with our ability to relate or interact with (if tautology isn’t your thing) not just co-boot campers but fellows and Andelans as well. It dealt with breaking the barriers that exist when different people from different places are brought into close proximity with and need to work with one another. To be sincere, this was the most uncomfortable part for me as I find it a bit difficult to strike up conversations with strangers, but as the trainer pointed out, you only need one thing in common with the stranger and he/she is not really a stranger anymore.
Questions: a person’s ability to ask questions, not random questions, but questions that elicit thoughtful and informative answers, is an art that only practice can teach. But to in that art lie some fundamental principles that I was exposed to. I was also taught the different broad categories of questions, and when each is necessary.
OOP (Object Oriented Programming): I was quite happy when we got to this topic because I had been developing in C# which has OOP principles at its core, but I tell you, OOP in JavaScript is a different beast altogether. I had to create a class, constructor and member methods in a language that until ES6, didn’t have any special syntax for any of the three and which used camel case for everything, variable names, method (function) declarations, etc. It was a grueling transition, but it was worth it in the sense that I broke me out of the shell I was casting myself into.
TDD (Test Driven Development): this was arguably the most absurd thing I had to learn. Let me try and explain to non-programmers, imagine you want to cast a reinforced concrete pillar. You create the wooden cast for the pillar and set it up. But instead of putting the iron rods in, pouring the concrete and then waiting for it to set before testing for strength, you are told by your supervisor to first push the empty cast to ‘see’ if it falls. You that, and of course it falls, then your supervisor allows you to add the rods, pour the concrete and allow it to set. Then you try pushing it again and surprise-surprise, it doesn’t tip over again. That’s exactly how test-driven development works. You have a set of requirements given by the clients, based on those requirements, you the developer writes out tests. These tests are blocks of code that make sure your program delivers what it is supposed to. You run those tests and as is expected, they fail (you’ve not written the program you’re testing yet). It is only after they fail that you are free to write code to implement your requirements and handle all test cases. This process is known as the red-green-refactor cycle. If it still sounds like gibberish to you after my valiant attempt at an explanation, don’t be dismayed, if you continue down the software development path, you’ll definitely meet soon.
Writing Proficiency: as a human being, you might not get to travel to every place in the world but your writings can. And you as a person would be judged based on the quality of your writing. This was the idea being hammered into us in this topic. I was taught to make my writing concise, coherent and absorbing. And trust Andela, we were tested on it.
Agile Programming: In programming circles, ‘agile’ is probably the buzzword most thrown around. It is mostly used by douche programmers trying to show their self-importance (this is the opinion of the author and should not be taken as the word of the gods or Morgan Freeman). Despite this, agile is a very important software development methodology that like our fast-food age, seeks to get quality work done in as little time as possible by removing the elaborate planning and documentation processes of earlier methodologies. This allows development teams to be nimble and very adaptable to changing software requirements. This here author is very proud to say that he is a signatory to the agile manifesto (yes, it’s a thing. Google it).
Feedback: I studied Electrical and Electronics Engineering at the Federal University of Technology, Akure and in the course of my studies I took several control engineering courses. One of the first things that became apparent to me was that the most robust control systems had feedback loops. This holds true for life as well, if we would develop as humans, feedback is indispensable. In software development, feedback is what makes you a world class developer. Feedback from the community (developer community, not your local government) in the case of an open source project, feedback from your colleagues and boss help you become a better programmer because they’ll open your eyes to things you may not have considered on your own. But receiving feedback requires humility because feedback won’t always come the way you like, but receive the good and the bad alike.
The post was getting kind of long and in keeping with the rules of concision, I’ll write the second set of nine topics in a subsequent post. Thanks.
GIT - For The Absolute Beginner (Part 2)
7 years ago · 5 minutes read
As a sequel to this post on the common git commands that you would find helpful in your workflow, this post aims to be a glossary of technical terms used when working with git in particular but could also apply to other version control systems. In this tutorial, I would be taking you through a simple git setup from beginning to end. We would initialize the git repository, add files to it, add remotes, and push code to origin. Future articles would deal with adding a gitignore file, removing files from tracking, branching, setting an upstream and pulling from origin.
Requirements
To follow this tutorial, two pieces of software are necessary and one is optional but recommended.
- You will need an account with an online version control system provider such as github.com, bitbucket.org or gitlab.com. I recommend going with github.com as it is the most widely used online VCS provider. The registration process is simple and intuitive.
- You will need the git command line tools installed on your computer.
- For macOS users, it can be gotten here
- For Windows users, it can be downloaded here
- For Linux users, it can be gotten via the package manager with
sudo apt-get install gitfor Debian based distributions andsudo yum install gitfor Fedora-based distributions.
- The optional thing is a text editor. There are a few popular ones out and about in the wild but I’ll recommend
Visual Studio Codebased on personal experience. It can be gotten here (for Windows, MacOS and Linux). The text editor would be used for working on the files we’ll add to tracking.
Procedure
- Since you just installed git, you would need to configure git. For that we would need to run two commands:
git config --global user.name "John Doe"
This command is for you to set your name as you want it to reflect on the remote sites you would be pushing your code to. The John Doe is an example and/or placeholder and should be replaced with your name.
git config --global user.email "john@doe.org"
As was stated for the previous command, the john@doe.org is also a placeholder and you should be replaced with the email address that you used for the online version control system registration.
With that out of the way, we go ahead and create a folder that would contain our code. Create a folder named
git-workflowNB: creating folders on each OS platform is different, so I would leave it to you to do.Next open that folder in the terminal (for macOS and Linux users) or the command prompt (for the Windows users). I created my folder in the Documents directory on my Mac, so to get into that folder, I would run the command:
cd /Users/winner-timothybolorunduro/Documents/git-workflow
- The next command we are to run would initialize the folder as a git repository. Initializing adds a hidden folder and a bunch of files that git uses to track changes to the files you add to tracking. The command is:
git init
this gives an output in the terminal similar to this:
Initialized empty Git repository in /Users/winner-timothybolorunduro/Documents/git-workflow/.git/
- Now that we have configured our folder as a git repository, let us add the files we want in our repository. Here the recommended text editor Visual Studio code comes in handy. If you installed it, you can open the folder in Visual Studio Code from the terminal (on macOS and Linux) by running the command:
code .
this starts the visual studio code and opens the folder in the app. Create three files, index.html, styles.css and script.js. These files would be what we add to tracking.
- Next we add the files to tracking by using the git command line. We use the
addcommand and pass the files to be tracked as arguments. In this instance, we would run:
git add index.html
git add styles.css
git add script.js
- Next we commit the files added. A commit is just a point of record for all that has been done up until that point. We commit using the git command-line tool and we also need to give a commit message which is basically a description of what we have done till that point. In our case we’d run:
git commit -m "added code files"
- Now that we have set up our local repository, let's create a remote one so we can have our code at a remote location too. So we go to GitHub and create a new repository. look for the new repository button as shown below and click it
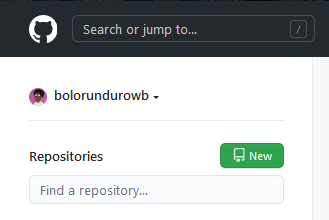
When clicked, an interface such as the one below is displayed.
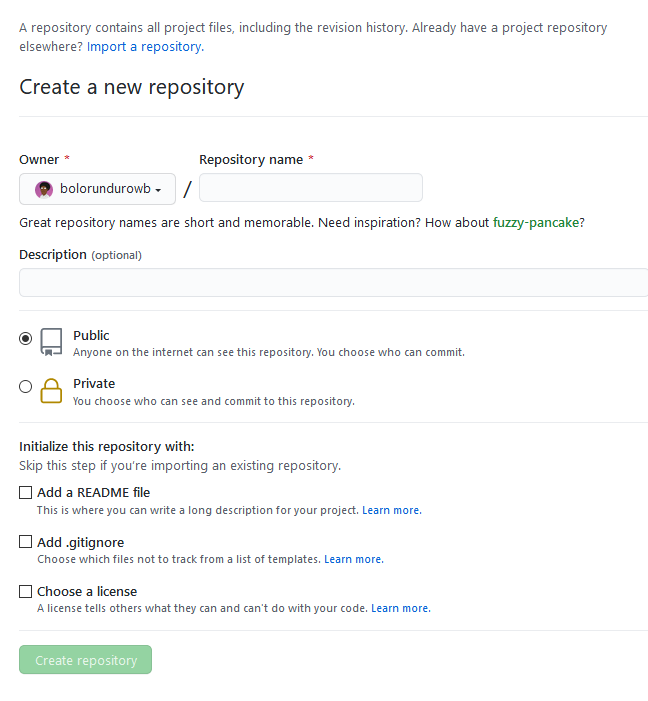
Fill in git-workflow for the repository name and click the "create repository" button.
Copy the link shown in the text box and proceed to the next step.
- Now we add the remote repository that our local repository would track. This means we can send code from our local working folder to the GitHub repository and pull any code there to our local machine. To add a new remote, we run the command:
git remote add origin https://github.com/bolorundurowb/git-workflow.git
- With that done we can push the code files from our local machine to GitHub. Simply run the following git command:
git push origin master
The push command is used to send commits from the local machine to a remote branch. Once this is done, we refresh our repository’s GitHub page and we’ll see our code files there.

And this is what my terminal looked like after running the commands:

With that we come to the end of an initial dip into git and version control in general. My next article would get us into things like branching. I’d love to hear your feedback and suggestions in the comment section. Have a great time learning.